In the domain of home maintenance, garage door spring replacement stands out as a task that demands precision and understanding of the mechanics involved. The process begins with the essential step of identifying whether your garage utilizes torsion or extension springs, each catering to different weight distributions and operational demands. This guide aims to equip homeowners with the knowledge to execute this replacement efficiently, emphasizing the significance of adhering to safety protocols to prevent injuries and ensure functionality. By following the detailed steps outlined, homeowners can tackle this necessary upkeep, leading to a smoother and more reliable garage door operation.
When dealing with a broken garage spring, understanding the mechanics becomes crucial for both safety and effectiveness. WI Garage Door LLC recognizes that many homeowners face the challenge of a garage door not opening properly, often stemming from spring-related issues. The intricacies of torsion spring service require careful attention to detail, as these components bear the entire weight of the garage door system.
Understanding Spring Types and Their Functions
Identifying the type of spring your garage door utilizes is a critical first step in the replacement process. Generally, there are two primary types of garage door springs: torsion springs and extension springs. Knowing which type your garage door system employs will guide your purchase and installation decisions, ensuring compatibility and efficiency.
Torsion springs are mounted above the garage door opening and typically run along a horizontal bar. They are known for their durability and ability to handle heavier doors. If your door operates with a smooth, controlled motion, it likely uses torsion springs. These springs work by twisting and storing energy, providing the necessary force to lift and lower the door smoothly.
Extension springs are installed on either side of the door, stretching and contracting as the door moves. They are more common in lighter doors and characterized by a more extensive range of motion. These springs extend when the door closes and contract when it opens, utilizing the principle of tension to support the door’s weight.
WI Garage Door LLC emphasizes that both types of springs have specific safety requirements and lifecycle expectations. The spring replacement cost can vary significantly depending on the type chosen and the complexity of the installation. Understanding these differences helps homeowners make informed decisions about their garage spring repair needs.
For Green Bay garage service requirements, recognizing the signs of worn or damaged springs becomes essential. Common indicators include unusual noises during operation, visible gaps in the spring coils, or the door appearing to struggle when opening or closing. When these symptoms appear, consulting with door spring experts becomes advisable to prevent further damage to the garage door system.
Torsion Spring Characteristics
Torsion springs operate through a twisting motion that stores and releases energy. These springs are typically mounted on a shaft above the garage door opening and are wound tightly to create the necessary tension. The winding process requires specific tools and expertise, making torsion spring service a task that demands careful attention to safety protocols.
The lifespan of torsion springs generally ranges from 10,000 to 15,000 cycles, with each cycle representing one complete opening and closing of the door. Factors affecting longevity include the quality of the spring material, frequency of use, and environmental conditions. WI Garage Door LLC recommends regular maintenance to maximize spring life and ensure optimal performance.
Extension Spring Features
Extension springs function differently from their torsion counterparts, relying on stretching and contracting motions to support the garage door’s weight. These springs are typically mounted on either side of the door and are connected to pulleys and cables that help distribute the door’s weight evenly.
The installation and maintenance of extension springs often prove more straightforward than torsion springs, though they still require proper safety precautions. Emergency spring repair situations involving extension springs may be more manageable for experienced homeowners, though professional assistance remains recommended for complex scenarios.
Safety Considerations and Preparation
Safety remains paramount when undertaking garage door spring replacement. The tension stored in garage door springs can cause serious injury if not handled properly. WI Garage Door LLC strongly advises that homeowners understand these risks before attempting any spring-related work.
Before beginning any spring replacement project, gather the necessary tools and safety equipment. Essential items include winding bars, socket wrenches, safety glasses, heavy-duty gloves, and a reliable ladder. Having a helper present during the process provides additional safety and assistance with handling components.
The workspace should be clear of obstacles and well-lit to ensure optimal visibility during the replacement process. Disconnect the garage door opener to prevent accidental activation during the repair. If the door uses an automatic opener, ensure it remains disconnected throughout the entire replacement procedure.
Emergency Safety Protocols
Emergency garage spring repair Green Bay situations require immediate attention to safety protocols. When a spring breaks suddenly, the door may become extremely heavy and difficult to manage. Never attempt to operate a garage door with a broken spring, as this can cause additional damage to the door system or result in personal injury.
If a spring breaks while the door is open, do not attempt to close it manually. The door should remain in the open position until proper repairs can be completed. Contact WI Garage Door LLC or another qualified service provider for emergency assistance when dealing with broken springs.
Step-by-Step Replacement Process
Once you have identified the type of spring your garage door uses, the next step involves safely removing the old spring and installing the new one for garage door spring replacement. This process requires methodical attention to detail and strict adherence to safety protocols.
Begin by securing the garage door in an open position to relieve tension on the springs. Ensure the door cannot close by clamping locking pliers onto the track on both sides just below the lowest roller. This step prevents the door from accidentally closing during the replacement process.
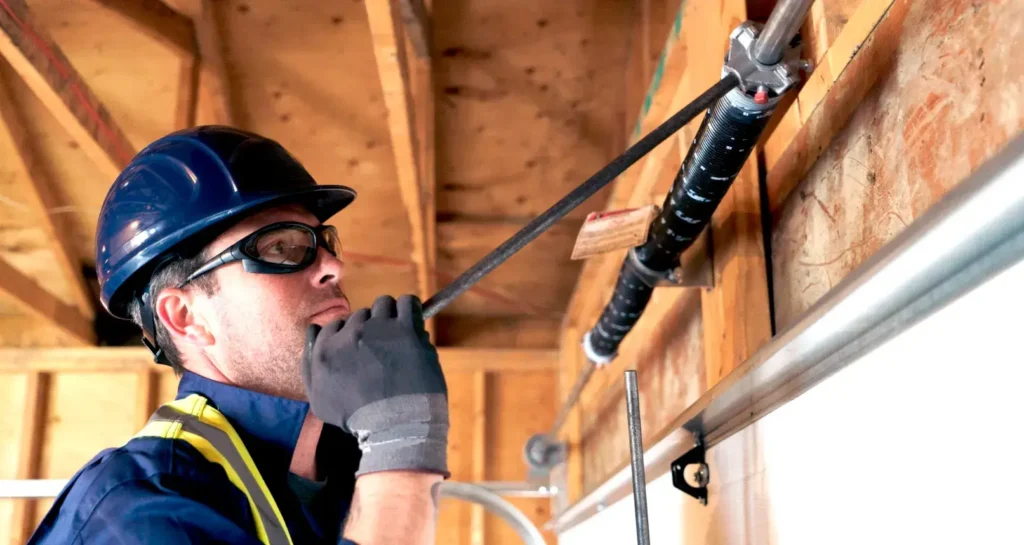
Next, disconnect the garage door opener to prevent accidental activation. With the door secured, locate the set screws on the spring being replaced. Wearing safety goggles and heavy-duty gloves, loosen these screws with a winding bar inserted into one of the winding cone holes. Carefully unwind the spring, one quarter turn at a time, until all tension is released.
The unwinding process requires patience and precision. Rushing through this step can result in injury or damage to the garage door system. Count the number of turns as you unwind to ensure proper tension when installing the new spring. WI Garage Door LLC recommends marking the winding cone position before beginning to provide a reference point for the new spring installation.
Once the old spring is fully unwound and relaxed, remove it from the bracket. Take note of the spring’s orientation and any washers or spacers that may be present. These components must be reinstalled in the same configuration with the new spring.
Installing the New Spring
Position the new spring, verifying it’s correctly oriented with the stationary cone facing the center bracket. The spring’s direction must match the original installation to ensure proper operation. Many springs are marked with colored ends to indicate left or right orientation.
Reattach the spring’s ends to the respective brackets and begin winding the spring, following the manufacturer’s recommended number of turns. The winding process should be gradual and controlled, with each turn creating additional tension in the spring. Use the winding bar to apply steady pressure while turning the spring.
Secure the set screws tightly once the proper tension is achieved. The screws should be torqued to the manufacturer’s specifications to prevent loosening during operation. Test the spring tension by carefully lifting the door manually to ensure it balances properly at various positions.
Spring Tension Adjustment
Proper spring tension fix requires understanding how the door should balance. A correctly tensioned spring allows the door to remain stationary when lifted to any position between fully open and fully closed. If the door falls when released, additional tension may be needed. If it rises when released, the spring may be over-tensioned.
WI Garage Door LLC emphasizes that achieving proper balance is crucial for the longevity of both the springs and the garage door opener. An unbalanced door places additional stress on all components and can lead to premature failure.
Testing and Final Adjustments
After installing the new spring, conduct thorough testing to ensure proper operation. Remove the locking pliers from the tracks and carefully test the door’s balance. The door should lift smoothly and remain stable at any position when manually operated.
Reconnect the garage door opener and test the automatic operation. The door should open and close smoothly without jerking or binding. Listen for unusual noises that might indicate improper installation or adjustment needs.
Maintenance and Longevity Tips
Regular maintenance extends the life of garage door springs and prevents unexpected failures. WI Garage Door LLC recommends implementing a routine maintenance schedule that includes visual inspections, lubrication, and balance testing.
Visual inspections should occur monthly, looking for signs of wear, corrosion, or damage. Pay particular attention to the spring coils, checking for gaps or separation that might indicate fatigue. Early detection of problems allows for proactive replacement before complete failure occurs.
Lubrication of moving parts should be performed every six months using a high-quality garage door lubricant. Apply lubricant to the springs, hinges, rollers, and tracks to ensure smooth operation and reduce wear. Avoid using heavy oils or greases that can attract dirt and debris.
Balance testing should be conducted quarterly by disconnecting the opener and manually lifting the door. The door should lift smoothly and remain stable at various positions. If balance issues are detected, contact a professional for adjustment or replacement.
Seasonal Considerations
Green Bay garage door spring maintenance requires attention to seasonal changes that can affect spring performance. Cold temperatures can increase spring tension, while warm weather may cause expansion and reduced tension. Monitor door operation during seasonal transitions and adjust as necessary.
Winter conditions may require additional lubrication to prevent freezing and ensure smooth operation. WI Garage Door LLC recommends using cold-weather lubricants specifically designed for garage door applications during winter months.
Common Issues and Troubleshooting
Understanding common garage door spring problems helps homeowners identify when professional assistance is needed. Frequent issues include uneven door operation, excessive noise, and premature spring failure.
Uneven door operation often indicates worn or damaged springs that require replacement. The door may appear to struggle on one side or operate with jerky movements. These symptoms suggest that the springs are no longer providing balanced support.
Excessive noise during operation can indicate several problems, including worn springs, inadequate lubrication, or misaligned components. Regular maintenance addresses most noise issues, but persistent problems may require professional evaluation.
Premature spring failure can result from several factors, including poor quality springs, excessive use, or environmental conditions. Green Bay residential garage spring services should address these issues through proper spring selection and installation techniques.
When to Seek Professional Help
While some homeowners may feel comfortable performing garage door spring replacement, certain situations require professional assistance. Complex installations, multiple spring failures, or safety concerns warrant consultation with door spring experts.
Emergency garage spring repair situations often require immediate professional attention. WI Garage Door LLC provides emergency services for situations where spring failure has left the door inoperable or presents safety hazards.
Garage torsion spring repair Green Bay services offer specialized expertise for complex torsion spring systems. These springs require specific tools and knowledge that may not be available to typical homeowners.
Choosing Quality Replacement Springs
Selecting appropriate replacement springs significantly impacts the performance and longevity of the garage door system. Quality springs manufactured from high-grade steel provide superior durability and consistent operation.
Spring specifications must match the door’s weight and size requirements. Using incorrect springs can result in poor performance, premature failure, or safety hazards. WI Garage Door LLC recommends consulting with professionals to ensure proper spring selection.
Consider upgrading to higher-quality springs when performing replacements. While initial costs may be higher, premium springs often provide longer service life and better performance, resulting in lower long-term costs.
Spring Cycle Ratings
Understanding spring cycle ratings helps homeowners make informed decisions about replacement options. Standard springs typically offer 10,000 cycles, while high-cycle springs may provide 25,000 or more cycles of operation.
The cycle rating directly relates to the spring’s expected lifespan. Families with frequent garage door use should consider high-cycle springs to reduce the frequency of replacements. WI Garage Door LLC can provide guidance on selecting appropriate cycle ratings based on usage patterns.
Professional Installation Benefits
While DIY garage door spring replacement is possible, professional installation offers several advantages. Experienced technicians possess the tools, knowledge, and safety equipment necessary to perform installations efficiently and safely.
Professional installers understand the nuances of different spring types and can ensure proper tensioning and adjustment. They can also identify potential issues with other garage door components that might affect spring performance.
Warranty coverage often requires professional installation. Many spring manufacturers void warranties if springs are not installed by qualified technicians. This protection can provide valuable peace of mind and financial security.
Green Bay garage repair services offer convenient scheduling and comprehensive solutions for spring replacement needs. Professional services include disposal of old springs, system testing, and performance optimization.
WI Garage Door LLC provides comprehensive garage door spring replacement services with experienced technicians who understand the unique requirements of different door systems. Professional installation ensures optimal performance and safety while providing warranty protection for the work performed.
The investment in professional installation often proves cost-effective when considering the time, tools, and potential risks associated with DIY replacement. Professional services provide confidence that the work is completed correctly and safely, with ongoing support for any issues that may arise.
Read more:
WI Garage Door LLC’s Spring Replacement Guide: Essential Repair Strategies
Safety First: WI Garage Door LLC’s Dos and Don’ts for Spring Replacement