Starting a DIY garage door spring replacement requires careful preparation and adherence to safety protocols to avoid potential injuries and guarantee a smooth operation. The initial step involves a thorough assessment of the existing spring system to determine whether it uses torsion or extension springs, each of which requires a unique approach and tools. This preparation is crucial, not only to acquire the correct replacement springs but also to gather essential tools such as winding bars, an adjustable wrench, and safety equipment. As homeowners cautiously dismantle the current setup, one must consider the implications of spring tension and the systematic loosening of set screws.
Understanding garage door spring replacement in Green Bay WI becomes essential when dealing with Wisconsin’s harsh weather conditions that can accelerate spring wear and tear. The extreme temperature fluctuations throughout the year place additional stress on garage door components, making regular maintenance and timely replacement critical for optimal performance.
Preparing for Replacement
Before starting on the task of replacing garage door springs, it is important to gather all necessary tools and materials to guarantee a smooth and safe process. Professional garage door spring fix Green Bay WI specialists recommend thorough preparation as the foundation of successful DIY repairs.
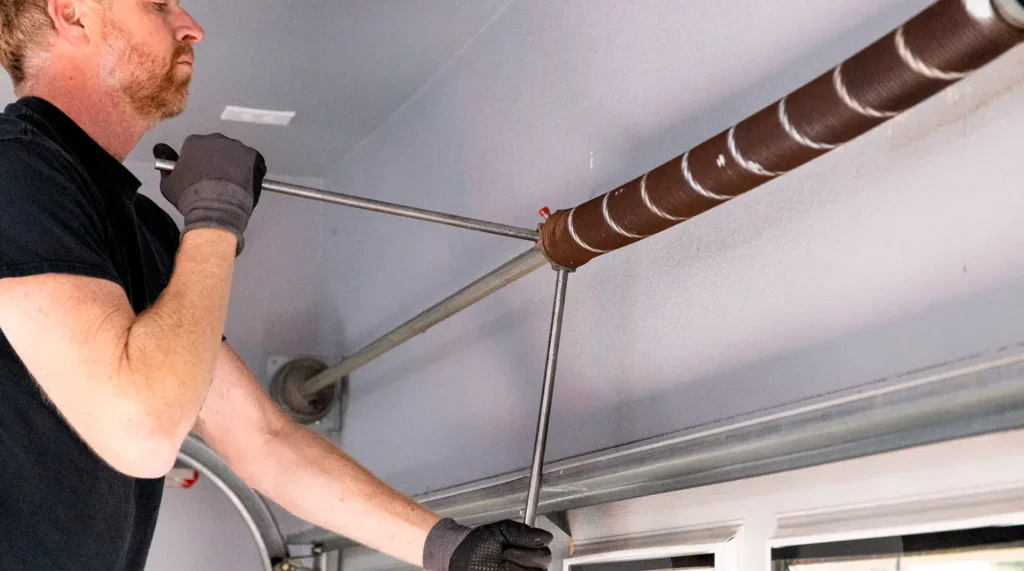
First, identify the type of spring system the garage door uses: torsion or extension springs. This determination guides preparation, as each type requires specific tools and handling techniques. Torsion springs are mounted horizontally above the garage door opening, while extension springs run parallel to the overhead tracks on both sides of the door.
For both types, winding bars are needed for adjusting or installing torsion springs, and safety cables for extension springs, which prevent the spring from becoming a projectile in case of breakage. Ensure access to a sturdy ladder, adjustable wrench, socket wrench, and a pair of vice grips. A good quality measuring tape and a marker for aligning and noting measurements are also indispensable.
Safety cannot be overstated when attempting garage door spring replacement. Equip with eye protection and heavy-duty gloves. The tension in garage door springs can cause significant injury if not handled correctly. Many homeowners in Green Bay choose WI Garage Door LLC for professional installation to avoid these risks entirely.
In addition, disconnect the garage door opener and confirm the door is stable and cannot snap down unexpectedly. Emergency garage spring repair Green Bay situations often arise from improper handling during DIY attempts, making professional assessment valuable for complex repairs.
Understanding Spring Types and Their Functions
Garage torsion spring repair Green Bay requires different techniques than extension spring replacement Green Bay WI. Torsion springs use torque to lift the garage door weight, while extension springs stretch and contract to provide lifting force. Each system has specific safety considerations and replacement procedures.
Signs your garage door spring is broken include loud snapping sounds, visible gaps in the spring coil, difficulty opening the door manually, or the door appearing crooked when opening. These indicators suggest immediate attention is needed to prevent further damage to the garage door system.
WI Garage Door LLC technicians frequently encounter situations where homeowners ask “Why is my garage door not opening properly?” Often, the answer lies in spring-related issues that have developed gradually over time. Understanding these warning signs helps prevent complete system failure.
Executing the Replacement
Having prepared all the necessary tools and safety equipment, the next step in garage door spring replacement is to carefully execute the removal and installation process. Same day garage door spring service in Green Bay becomes necessary when springs fail unexpectedly, but proper DIY execution can address planned replacements effectively.
Begin by securing the garage door in an open position, ensuring it cannot close inadvertently. With the door safely open, clamp the tracks just above one of the rollers to prevent any movement. This step is crucial for broken garage spring repair near Green Bay, as unstable doors pose significant safety risks during repair work.
Next, carefully disconnect the garage door opener if present. This step is essential to prevent any accidental activation during the replacement process. Modern garage door openers have safety features, but manual disconnection eliminates any possibility of unexpected operation.
With the opener disconnected, locate the springs. Remember, if the door has two springs, replace both even if only one is broken to maintain balanced tension. Affordable garage spring replacement Green Bay options often include purchasing springs in pairs, which proves more cost-effective than individual replacements over time.
Proceed by loosening the set screws on the broken spring with a winding bar, following strict adherence to manufacturer guidelines to avoid injury. Gradually release the tension in the spring using controlled, measured movements. This process requires patience and precision to prevent sudden spring movement.
Once the tension is fully released, remove the broken spring and replace it with the new one, reversing the removal steps. WI Garage Door LLC emphasizes the importance of proper spring selection, as incorrect specifications can lead to premature failure or inadequate door operation.
Special Considerations for Green Bay Climate
Green Bay garage door spring maintenance becomes particularly important due to Wisconsin’s climate extremes. Garage spring issues during winter in Wisconsin occur frequently as cold temperatures make metal components more brittle and prone to failure. The combination of temperature fluctuations and moisture can accelerate spring corrosion and fatigue.
Best time to replace garage door springs in Wisconsin typically falls during moderate weather periods when temperature stability reduces additional stress on new components. However, emergency situations require immediate attention regardless of weather conditions, making 24-hour garage door spring repair in Green Bay a valuable service option.
WI Garage Door LLC recommends seasonal inspections to identify potential spring problems before they result in complete failure. These preventive measures help avoid inconvenient breakdowns during extreme weather periods when garage access becomes most critical.
Professional vs. DIY Considerations
Is garage spring replacement dangerous? This question deserves serious consideration before attempting DIY repairs. Spring systems store tremendous energy under tension, and improper handling can result in severe injury or property damage. Trusted garage spring experts in Green Bay possess specialized tools and training to manage these risks effectively.
Green Bay residential garage spring services offer several advantages over DIY approaches, including warranty coverage, proper tool access, and expertise in handling various spring configurations. WI Garage Door LLC provides comprehensive service options that address both immediate repair needs and long-term maintenance requirements.
Professional technicians understand the nuances of different spring systems and can identify related issues that might not be apparent to homeowners. This comprehensive approach often prevents future problems and ensures optimal garage door performance.
Safety Protocols and Best Practices
Garage door won’t open after spring breaks scenarios require immediate attention to prevent further system damage. Attempting to force a door open with broken springs can damage the opener, tracks, or door panels, creating more expensive repair situations.
Top-rated garage door repair Green Bay WI services emphasize safety protocols that protect both technicians and homeowners during repair processes. These protocols include proper use of safety equipment, systematic tension release procedures, and comprehensive testing before completing repairs.
WI Garage Door LLC trains technicians in advanced safety techniques that minimize risk while ensuring reliable repairs. This training includes recognition of potential hazards, proper tool usage, and emergency response procedures for unexpected situations.
The systematic approach to garage door spring replacement involves careful documentation of existing spring specifications, methodical disassembly procedures, and thorough testing of completed installations. This attention to detail ensures reliable operation and extends component lifespan.
Understanding the relationship between spring tension, door weight, and opener capacity helps optimize system performance. Properly balanced garage doors operate smoothly, reduce opener wear, and provide years of reliable service. WI Garage Door LLC specializes in achieving this optimal balance through precise spring selection and adjustment.
Weather protection measures become particularly important in Green Bay’s climate. Proper lubrication, corrosion prevention, and regular maintenance schedules help maximize spring lifespan despite challenging environmental conditions. These preventive measures prove more cost-effective than frequent replacement cycles.
Emergency preparedness involves understanding when professional intervention becomes necessary. While DIY repairs can address many situations, complex problems or safety concerns warrant professional assessment. WI Garage Door LLC provides emergency response services for situations that exceed DIY capabilities.
The investment in quality replacement springs pays dividends through extended service life and reliable operation. Cheap springs may appear economical initially but often fail prematurely, creating repeated repair expenses and inconvenience. Professional-grade springs offer superior durability and performance characteristics.
Proper installation techniques ensure optimal spring performance and longevity. This includes correct mounting procedures, appropriate tension adjustment, and thorough system testing. Attention to these details prevents premature failure and ensures safe operation.
Regular maintenance schedules help identify wear patterns and potential problems before they result in system failure. Visual inspections, lubrication procedures, and operational testing provide early warning of developing issues. WI Garage Door LLC offers maintenance programs that address these requirements systematically.
The complexity of modern garage door systems often exceeds typical homeowner expertise. Advanced opener integration, smart home connectivity, and sophisticated safety features require specialized knowledge for proper maintenance and repair. Professional service ensures these systems operate as designed while maintaining safety standards.
Understanding warranty implications helps protect the investment in garage door systems. DIY repairs may void manufacturer warranties or insurance coverage, making professional installation more cost-effective over the system lifespan. WI Garage Door LLC provides warranty coverage that protects homeowners against defects and premature failure.
The decision between DIY and professional garage door spring replacement depends on multiple factors including skill level, tool availability, safety comfort, and system complexity. While basic spring replacement may seem straightforward, the risks and potential complications often justify professional service. Trusted professionals provide peace of mind along with reliable repairs that ensure long-term satisfaction and safety.
Read more:
WI Garage Door LLC’s Spring Replacement Guide: Essential Repair Strategies